Background: Scientists and naturalists keep journals using words, pictures, and numbers to collect and record their observations, questions, explanations, and connections. But don’t worry, you don’t have to be a professional to get started with a nature journal, anyone can do it! Observing and recording your thoughts about the world around you will help you slow down. It makes you look and look again. It’s an opportunity to get still, be quiet, and pay close attention to what lies all around you. Drawing what you see, in particular, leads us to notice biologically important details, such as the branching pattern of veins in a leaf or the arrangement of threads in the spider web, features we could easily miss if we were to keep only written notes. Even the most ordinary, everyday sights contain wisdom and wonder when we give them our full attention. This type of deep observation is something that we’re not very good at when we tend to favor short form content in our 21st-century lives; it is something that we can all cultivate to come into closer contact with nature’s rich teachings. Step into your nature journal era and allow deliberate attention, curiosity, and creativity to enrich your life.
I discovered the work of John Muir Laws when I was first starting out and have him to thank for giving me the tools to teach nature journaling to my students. Laws is the founder and host of the Nature Journal Club, a family-friendly, intergenerational community that connects with nature through art and field journaling. He co-founded and is president of the Wild Wonder Foundation, a non-profit organization dedicated to encouraging nature connection and conservation through attention, curiosity, art, science, and community. Laws has written and illustrated several books including The Laws Guide to Nature Drawing and Journaling (2016), The Laws Guide to Drawing Birds (2012), Sierra Birds: a Hiker’s Guide (2004), The Laws Guide to the Sierra Nevada (2007), and The Laws Pocket Guide Set to the San Francisco Bay Area (2009). He regularly contributes to Bay Nature magazine with his “Naturalists Notebook” column.
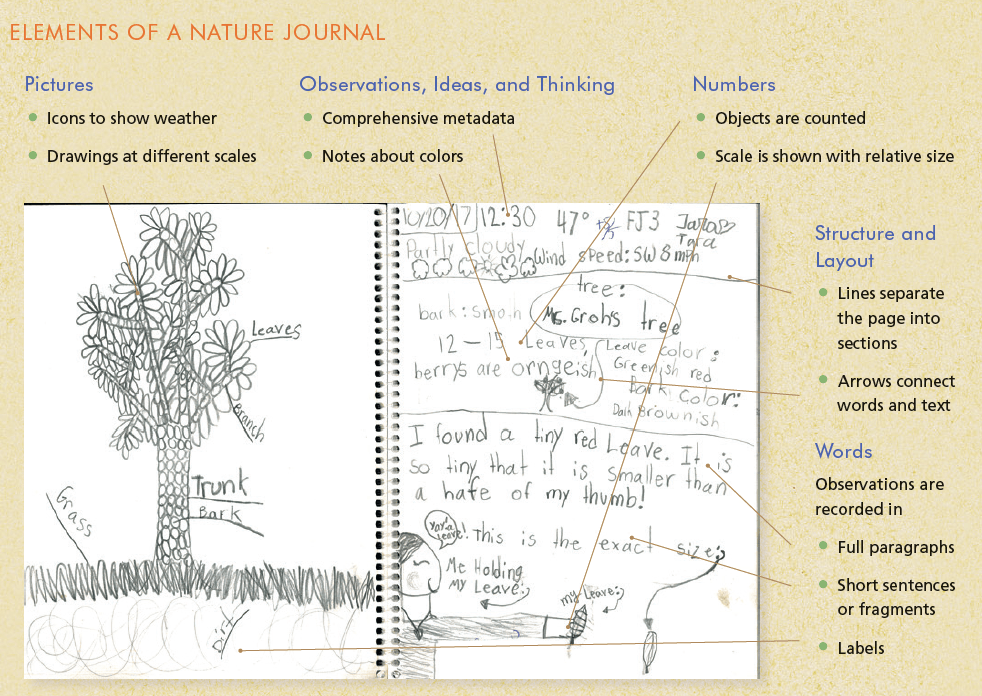
Image from Laws’ guide, How to Teach Nature Journaling
Author Amy Tan writes in her foreword of Laws’ guide, How to Teach Nature Journaling
“I think of nature drawing as a spiritual connection to nature, and nature journaling is a written testament of miracles in the wild. Each day, I wake with curiosity over what is happening in my yard. Each day holds discoveries that I write down.”
Materials:
When I work with young naturalists, I usually provide blank paper that is hole punched to keep in a binder or held together with loose binder rings, so that the journal can be circular with no beginning or end, just like the seasons of the year. That way you can add different types of paper to it depending on what you’ll be doing that day – sometimes you may want something sturdy like watercolor paper or cardstock, other days you may wish to use tracing paper or even sticky contact paper to capture found items in your journal.
Start with a piece of paper and a pencil! From there, you can find a bound book of multimedia paper that suits you if you wish. And then you can add in the bells and whistles like a set of colored pencils or even a travel watercolor set to your kit.

Activity:
The following routine is the sequence I like to start with every time I journal – even when I’m not teaching! It is in this routine that you can set the tone for the activity, whether you’re working alone or with a group of students. It provides structure that inherently gives kids the autonomy to make their own choices about what to record. What’s more, you get to build connection with them through this shared experiences, even though each person is wrapped in their own world of noticing and deep attention. Begin with writing down the date, the place, and any information about time of day or weather. An example:
January 17, 2025 10:30 am
Washington Park Arboretum Winter Garden
44 F, overcast with sunbreaks
Nature journalers call this “metadata” and it helps to remind you that your goal here is to deeply observe and record what you see, rather than create a beautiful piece of art.
Start with a simple, small item: like a leaf, a stone, or an acorn. To warm up your eyes, imagine that you are a tiny ant that is walking all the way around the edge of the item. Our brains are really good at filling in details for us without truly observing what is in front of us and this activity helps train the brain to pay closer attention to what is actually there, rather than what it expects to see there.
Blind Contour Drawing: Here, you’re going to draw without looking at your paper! The point of this exercise is to make that hand-eye coordination click into place. While imagining that you are that ant walking along the surface or edge of the leaf, put your pencil point down on the paper. Imagine that your pencil point is actually touching the leaf instead of the paper and without ever lifting your pencil, begin a slow walk around the edge of the leaf, as if you were a snail following all of the contours or curves in the object. When you get back to where you started from, take a look at your paper! It is probably a mess of lines that somewhat resembles the shape of the thing! Blind contour drawing gives your brain an opportunity to portray exactly what you are observing, instead of what you think your subject is supposed to look like. It’s messy. It’s an exercise in letting go.
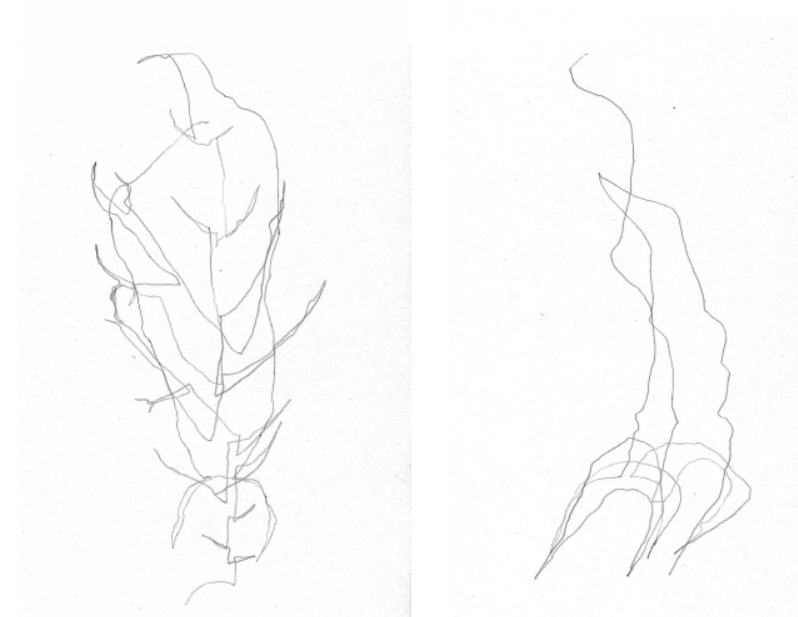
Blind Contour Drawings of the same leaf by Brian Hitselberger
Modified Contour Drawing: Do the exercise again, but this time you can peek at your paper! Still, spend the majority of your time (around 90%) looking at the object you are drawing, and only about 10% looking at the paper. Using a continuous line, do not lift the pencil from the paper while drawing! Move your pencil slowly and deliberately, inching along with the movement of your eye across the contoured edges of what you are observing.
The Real Deal: Now that you’ve warmed up your hand-eye coordination, continue to spend some time with the same object (or choose a new one!) John Muir Laws suggests starting with “I Notice, I Wonder, It Reminds Me Of…” or INIWIRMO. (If working with a group or with younger naturalists who aren’t writing yet, you can do this out loud and ask each participant to say something that hasn’t been heard yet. Older naturalists can then write down their observations).
- I Notice: Write down what you notice about the subject! This can be a bulleted list or a paragraph or labels with arrows pointing to the features on your sketch. Examples could be: the leaf is a purply maroon color; there are five lobes or points; it’s about the size of my palm.
- I Wonder: Here is a chance to let your curiosity bloom. Ask at least three questions about your object. For instance, why is this leaf red instead of green? Why are the edges serrated like a knife? Who made the bite mark holes in its flesh? What are the brown spots?
- It Reminds Me Of…: List something that your object reminds you of. Maybe it jogged a memory, reminding you of an experience you had previously? Maybe it has a physical resemblance to something else? You can even look at particular parts of an object, then come back to the object as a whole. For example, the leaf’s shape is like a hand or a star; its veins remind me of blood vessels on my wrist or a map of city streets; the color is like that Taylor Swift song Maroon.
Sketch what you see! Capture as many details as you can in your drawing. Remind yourself that the goal here is focused observation, not producing a beautiful piece of art! If you find yourself worrying about your picture not being “pretty enough”, turn it into a diagram with arrows and labels everywhere. This trick can help you take the pressure off of yourself and re-center your focus to deep observation, rather than artistic prowess.
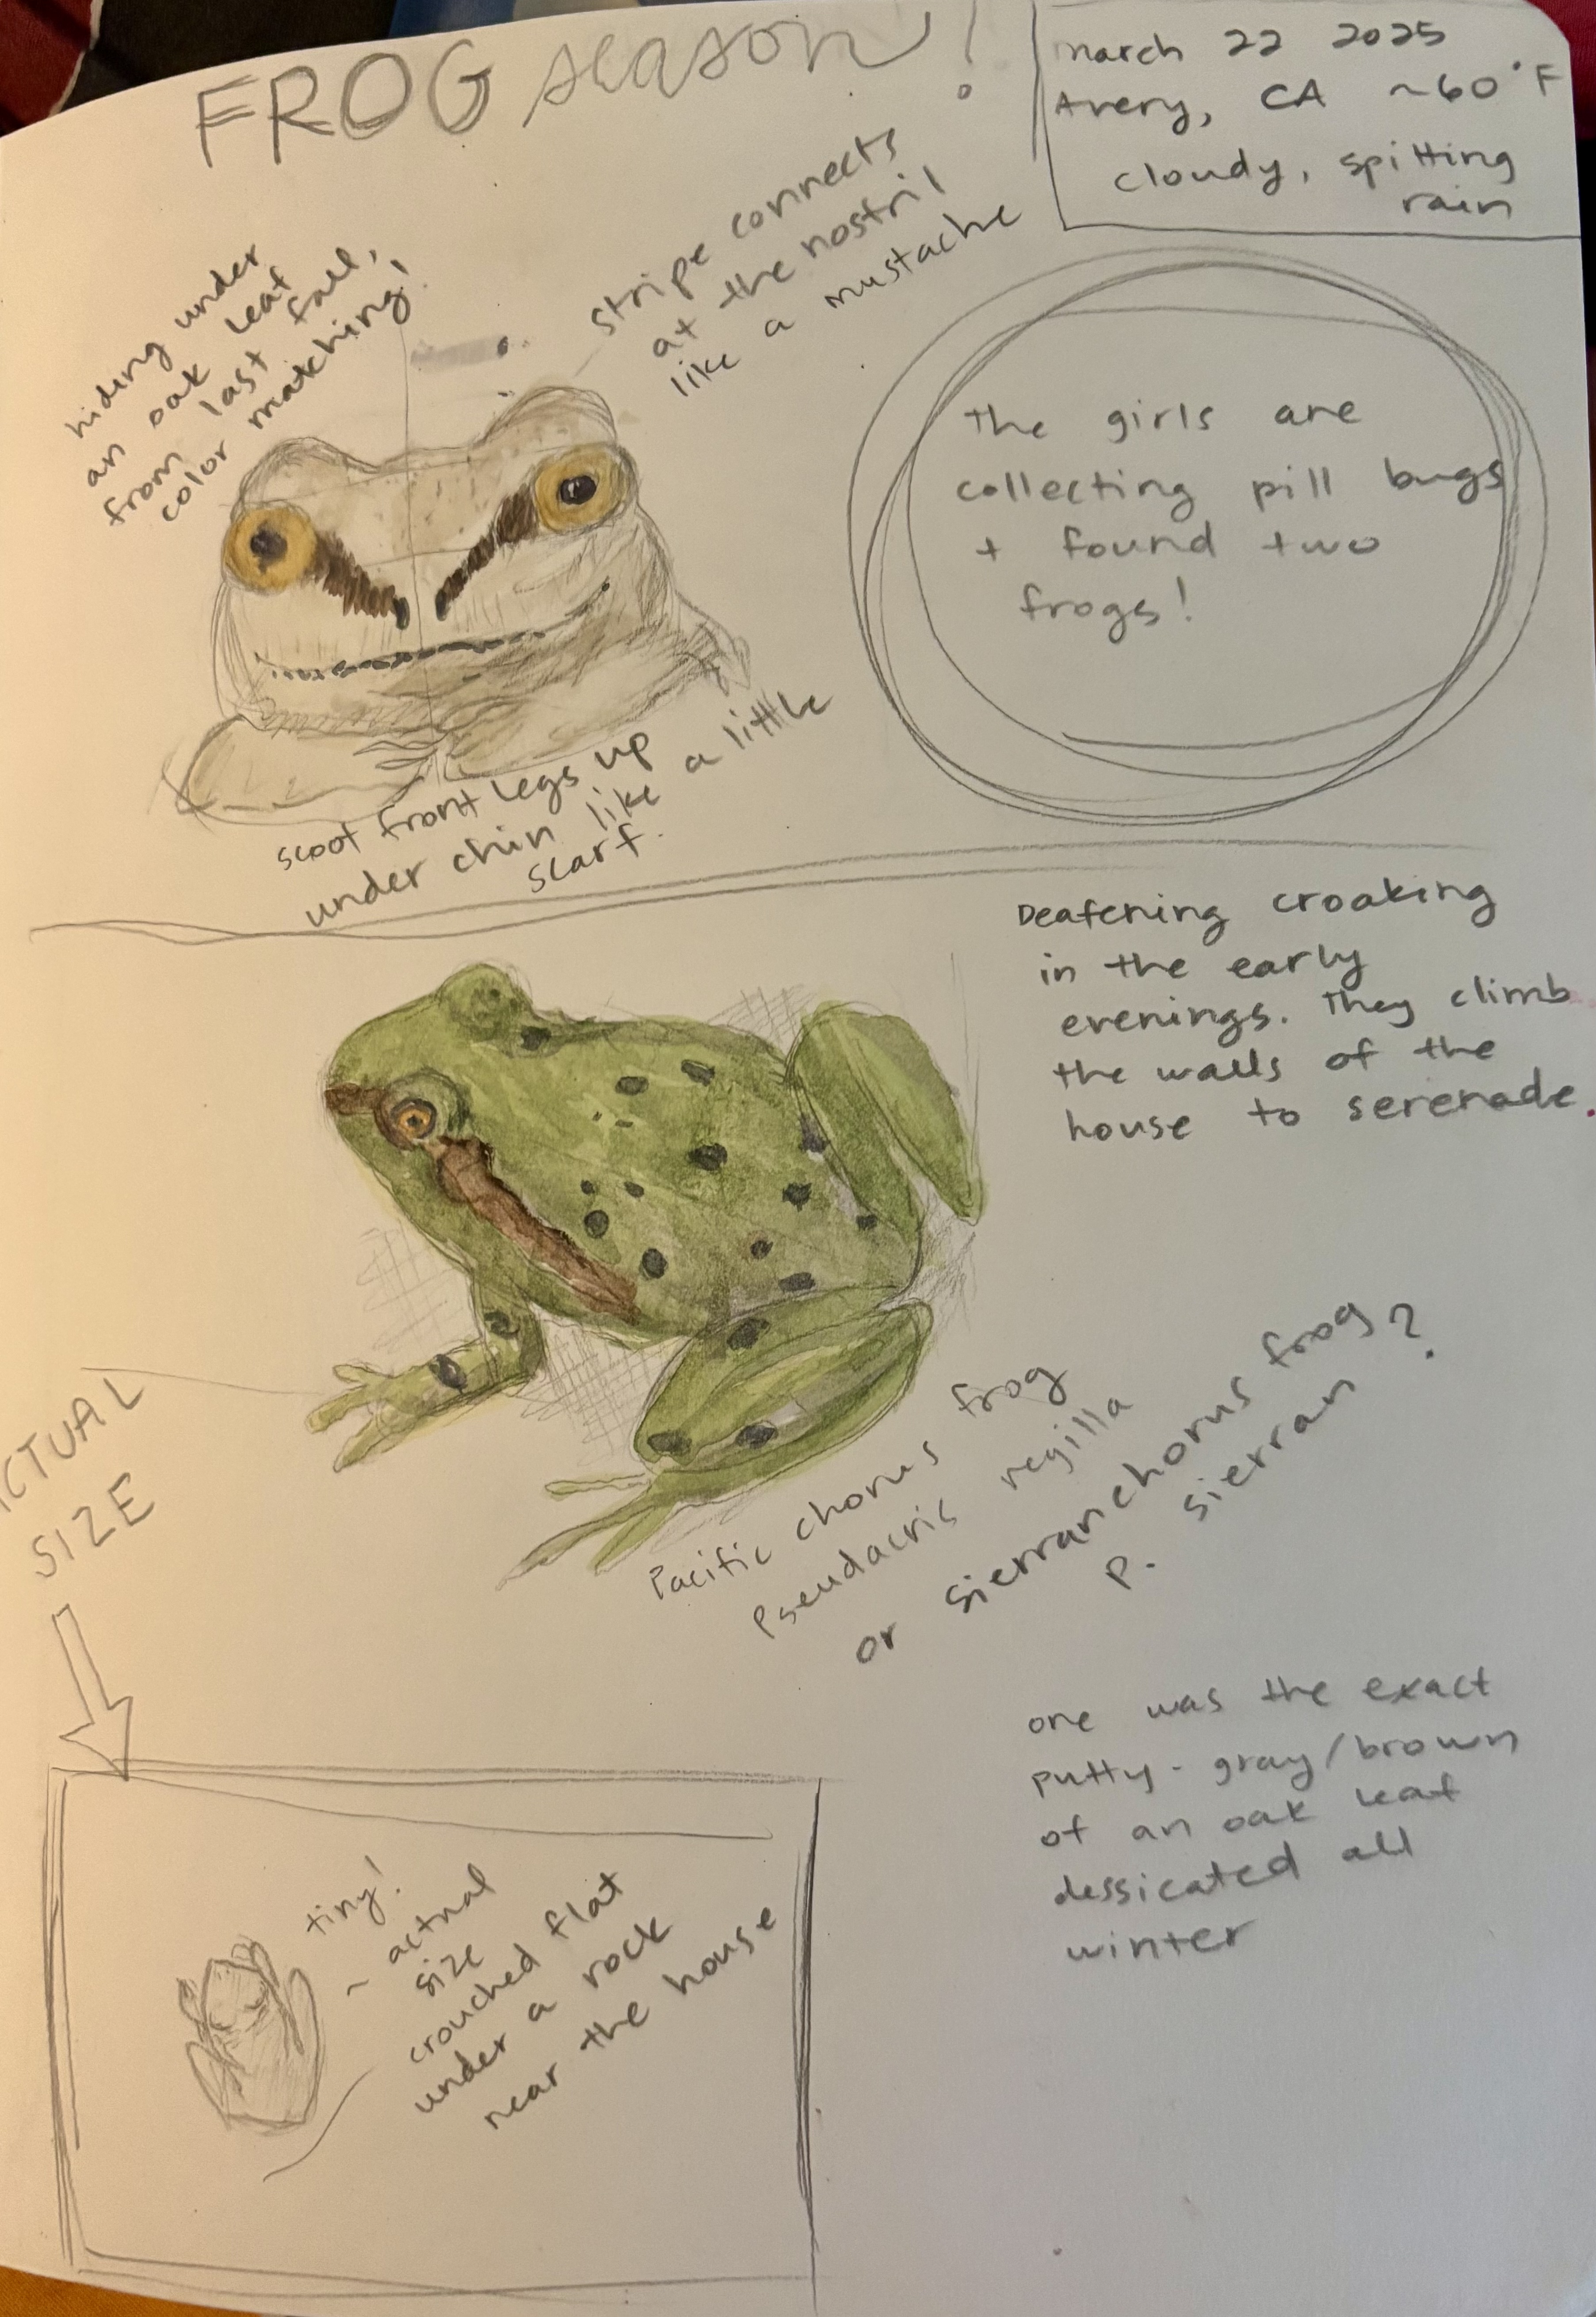
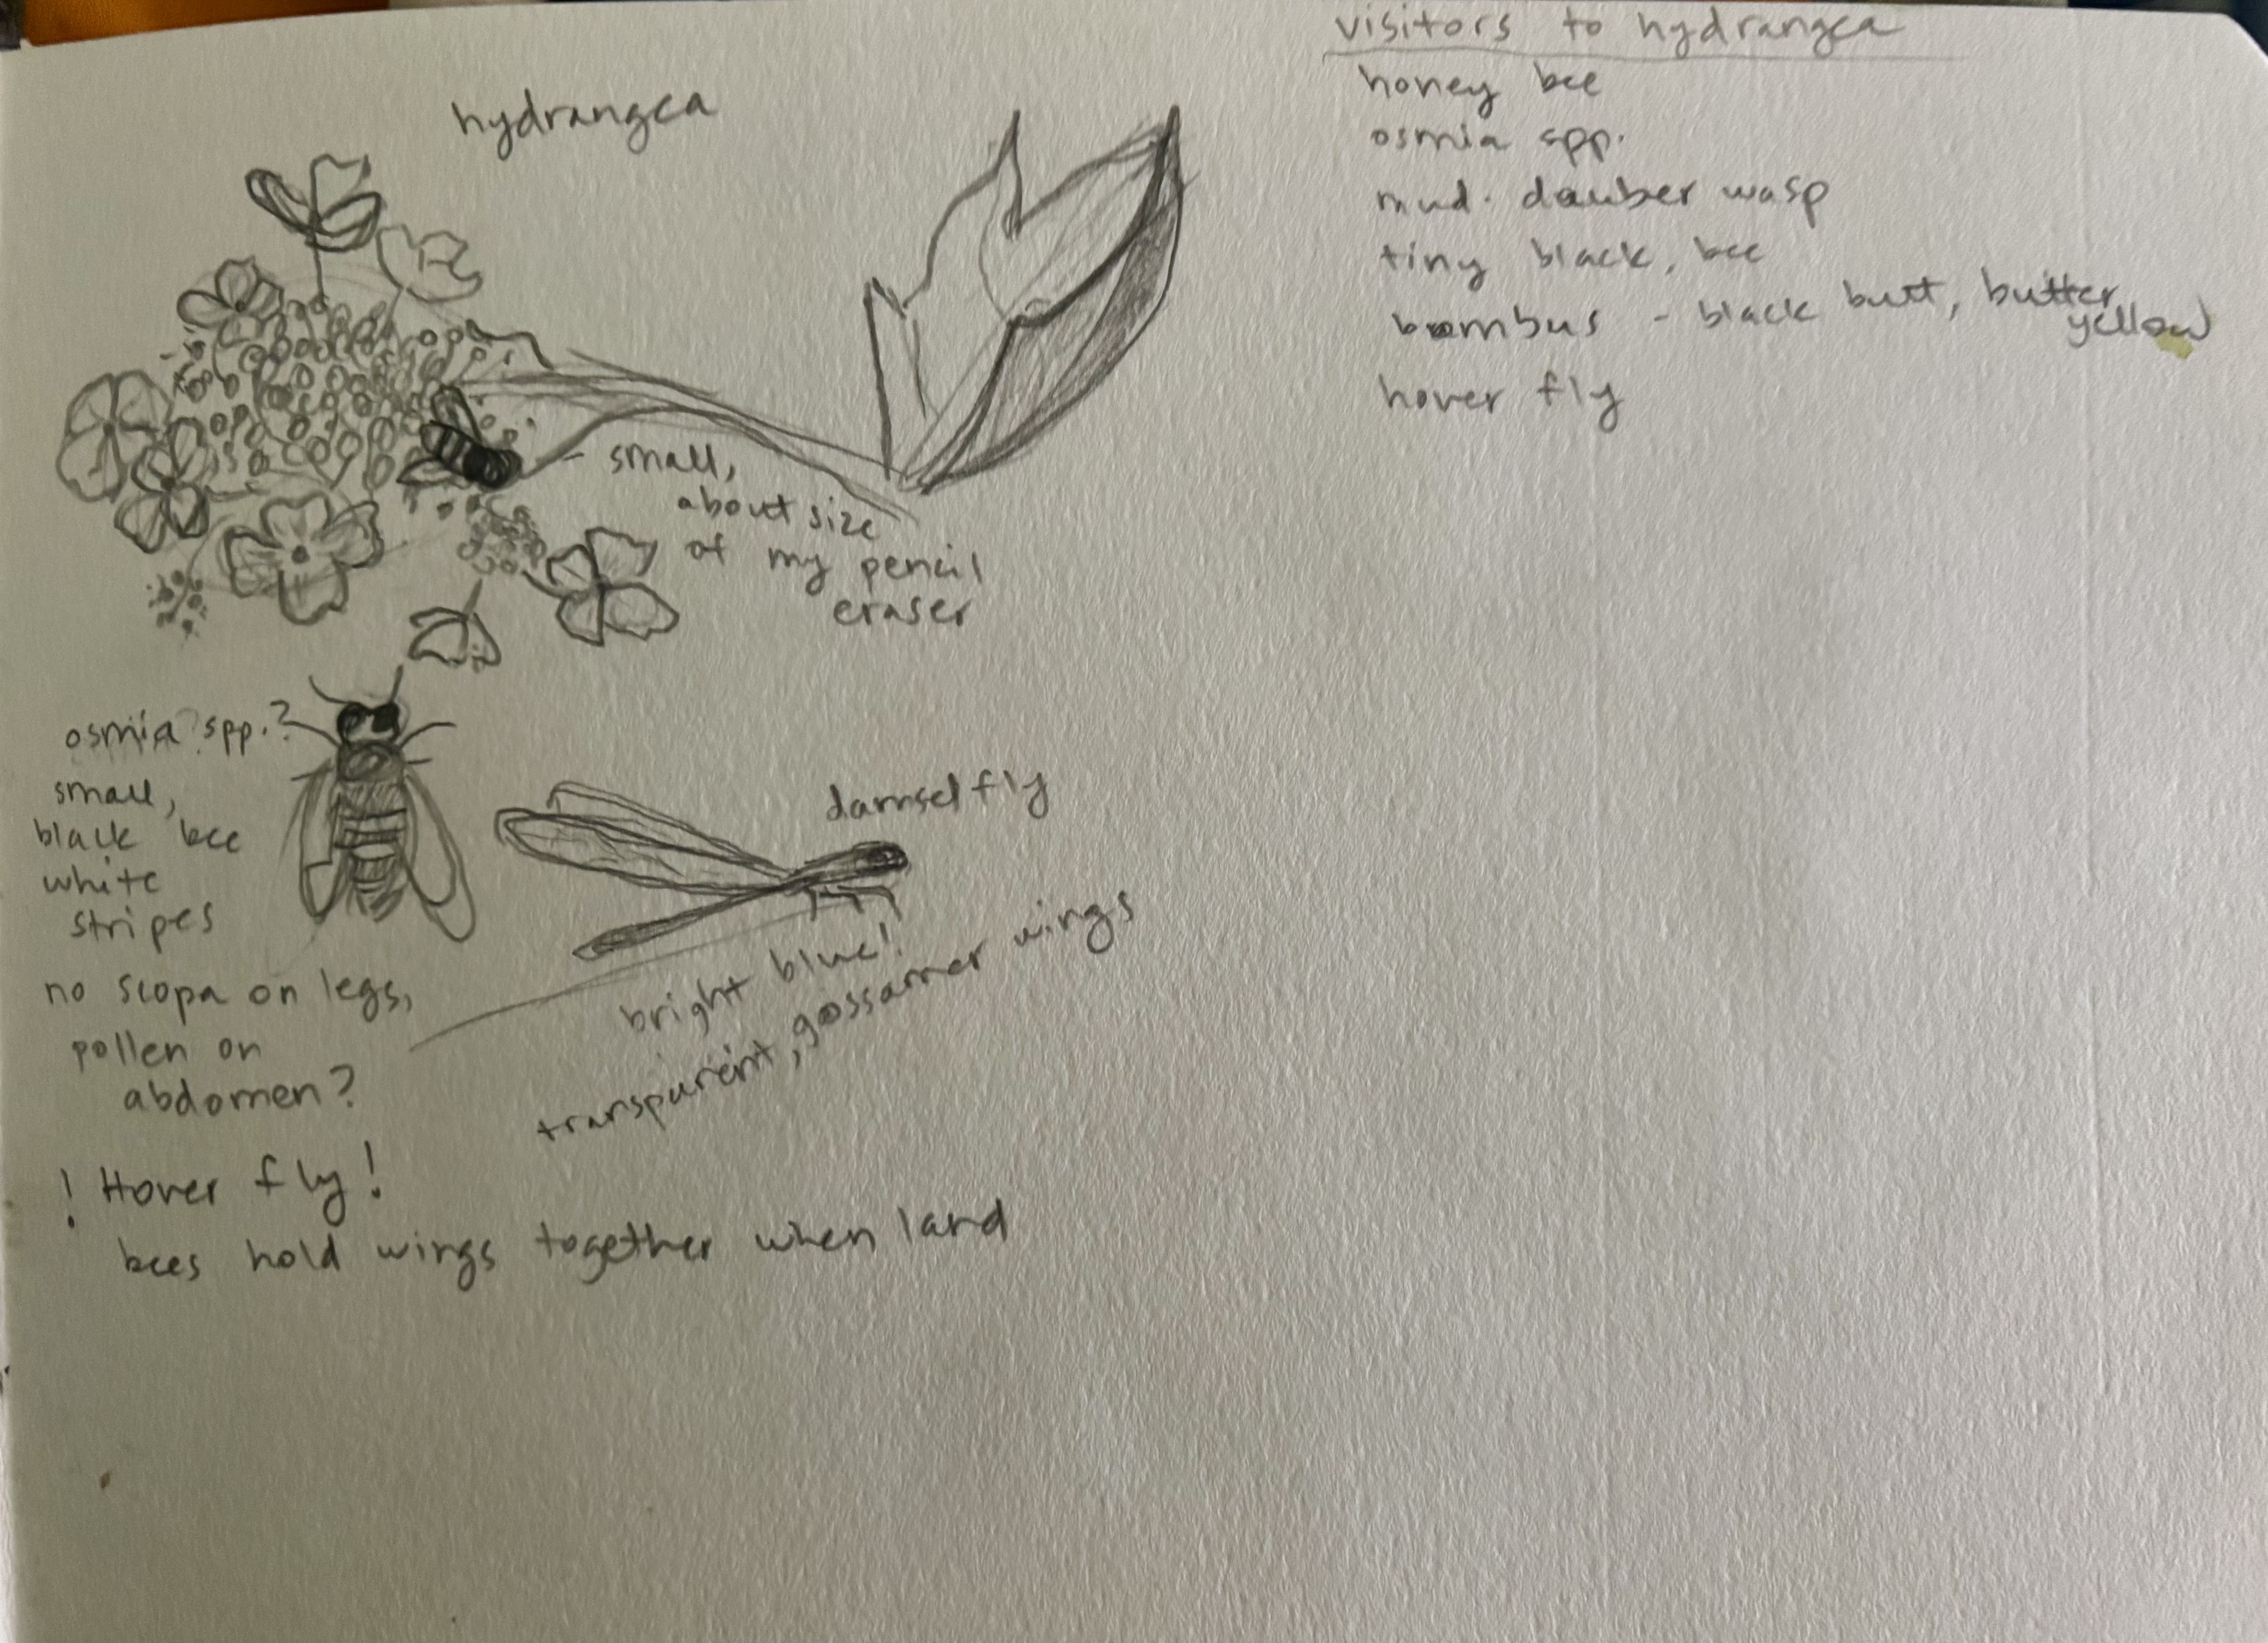


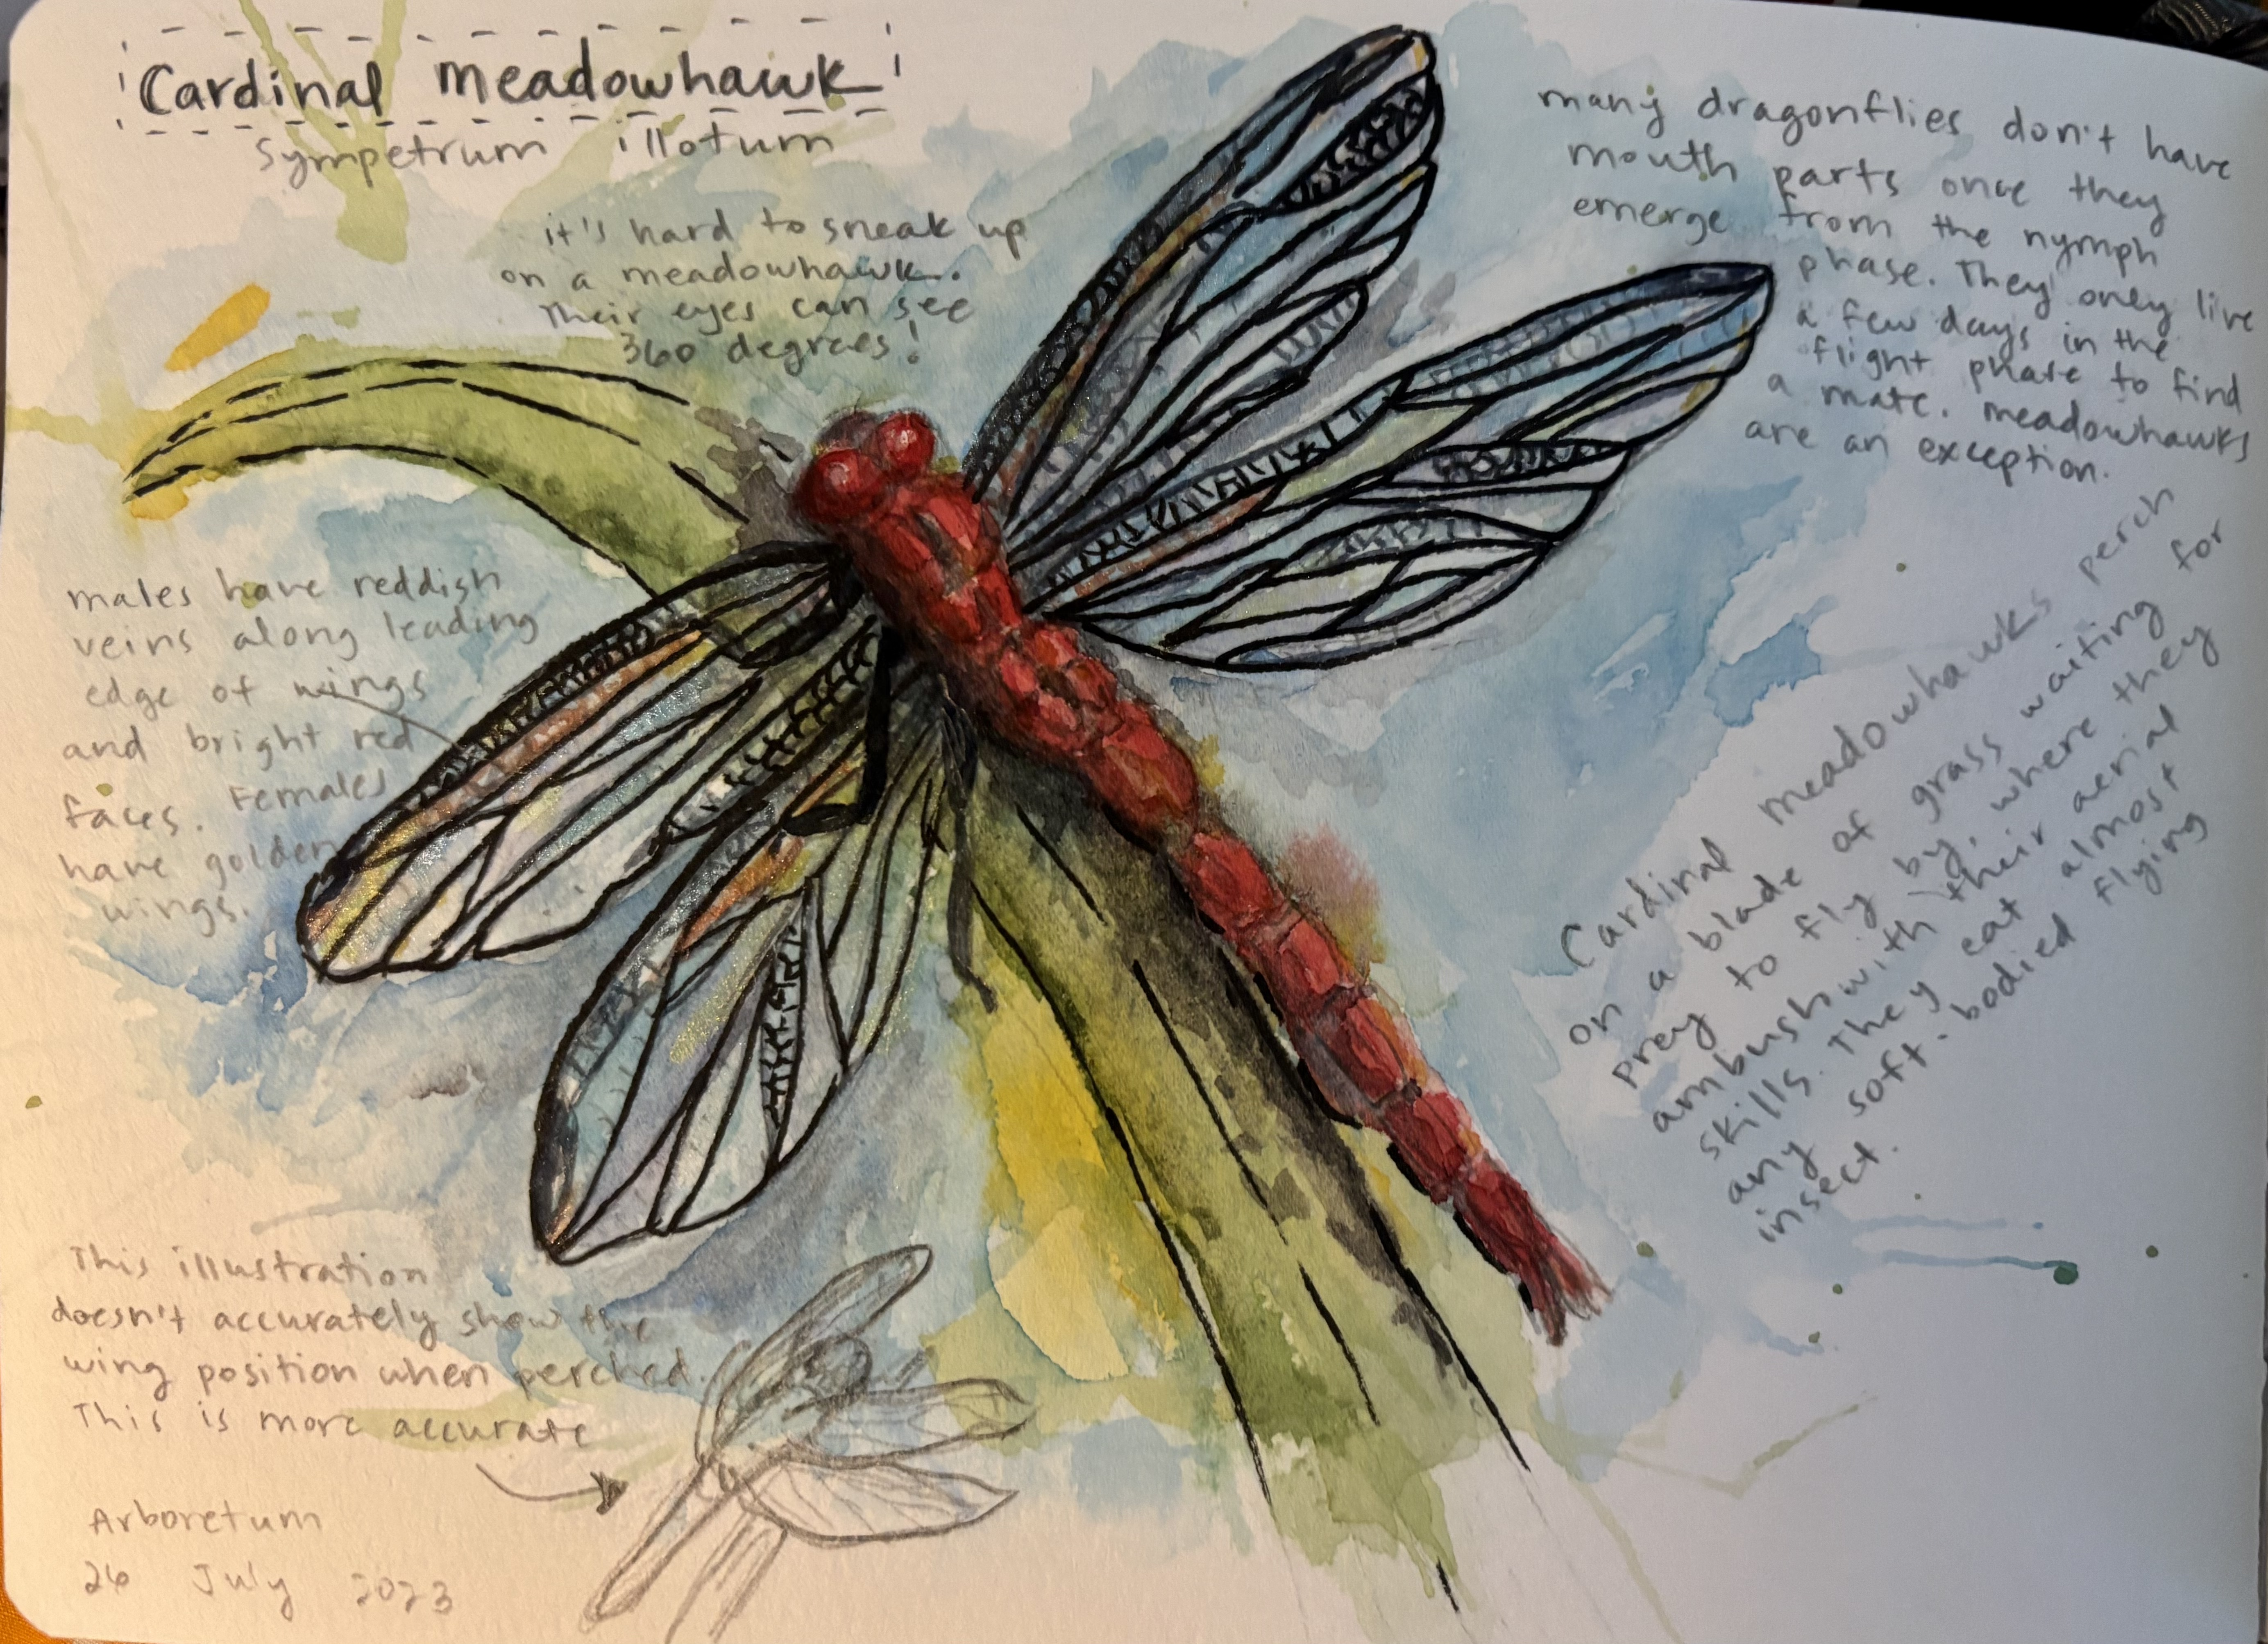
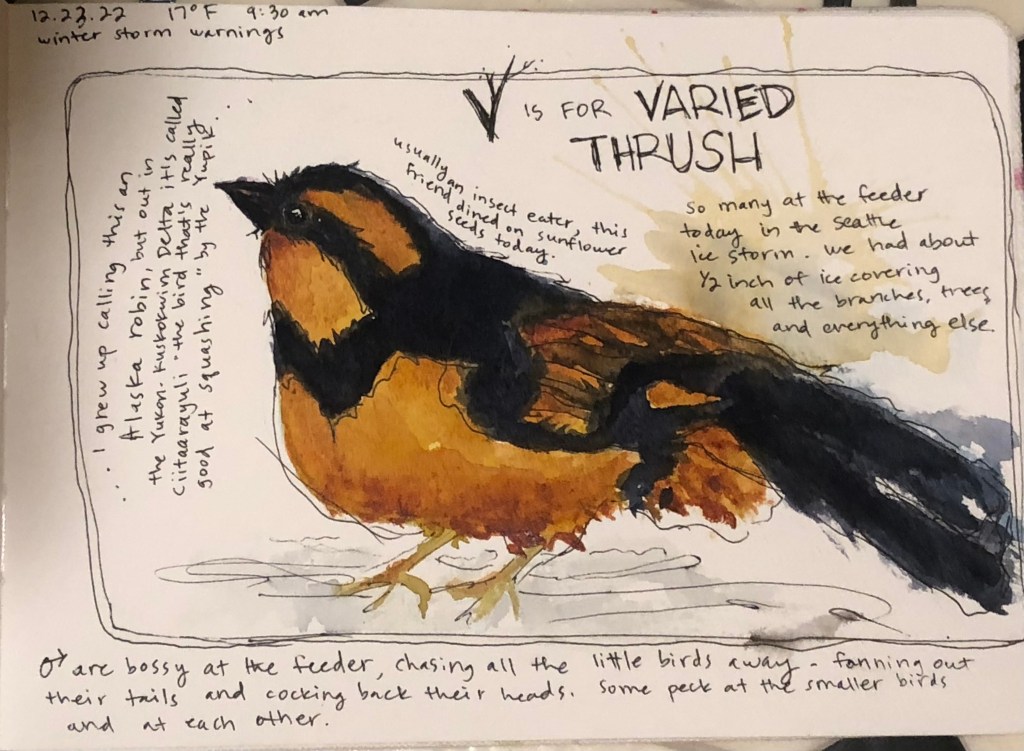
Example nature journal pages by the author, Brooke Krolick. Notice how none of these are “perfect” pieces of art! These were all done in the field with the exception of the Cardinal Meadowhawk which I completed later, at home, after watching the dragonflies at the pond at the Washington Park Arboretum in Seattle.
Extensions:
Race the Clock: Set a timer for 30 seconds. This is all the time you have to observe your object before you hide it from your view! Then try to draw your object from memory. (Spoiler alert. It’s hard.) Most of the time, students find this activity a challenge. So offer another 30 seconds to view the object and you’ll find that they pay much closer attention to the details so that they can sketch it more accurately a second time. This activity hones awareness of details, focus, and memory.
Guess My Leaf: If you have a small group of people, this is a fun game that, again, hones focus and awareness of the details of a natural object while taking the pressure off the idea of having to make beautiful art. Here, you’ll gather a number of the same objects – maybe they are leaves, grass seed heads, seed pods, or pine cones. Each person chooses an object to sketch with words, numbers, pictures in order to describe it in enough detail that another person could pick their leaf out of a line up. Give about 3-5 minutes for the sketch or diagram and then collect all the items and lay them out together on the ground or table. Each member chooses someone in the group to try to guess which leaf is theirs based on the details they recorded in their sketch.

Leave a comment