
Explore a rainy day with your puddle jumpers with these fun STEM activities
Background:
Imagine a giant invisible river in the sky made of water vapor instead of liquid water. These rivers are formed when winds in the atmosphere gather up huge amounts of moisture from the ocean. When the river in the sky flows over land, especially over mountains, it drops all that water as lots of rain or snow.

Atmospheric rivers can carry more water than the Amazon River! They vary in size but can be 250–375 miles wide and over 1,000 miles long. Atmospheric rivers are a natural part of the water cycle in the western U.S. and in the Pac NW, they occur most often in the fall and winter. They travel through the lowest layer of the sky, only about half a mile to a mile above the Pacific ocean, where they form. When one of these sky-rivers reaches land and runs into one of our Pac NW mountain ranges, it gets pushed upward, higher into the atmosphere. As the air rises and gets colder, the water vapor turns into raindrops or snowflakes and sometimes creates big storms. You may have seen this process happen at home when you are boiling water or taking a shower. The steam (water vapor) rises into the air and when it collides with something colder than air, like a window or your bathroom mirror, you can see it condense there as liquid water. If you drag your finger through the condensation, your finger comes away wet with the liquid water.
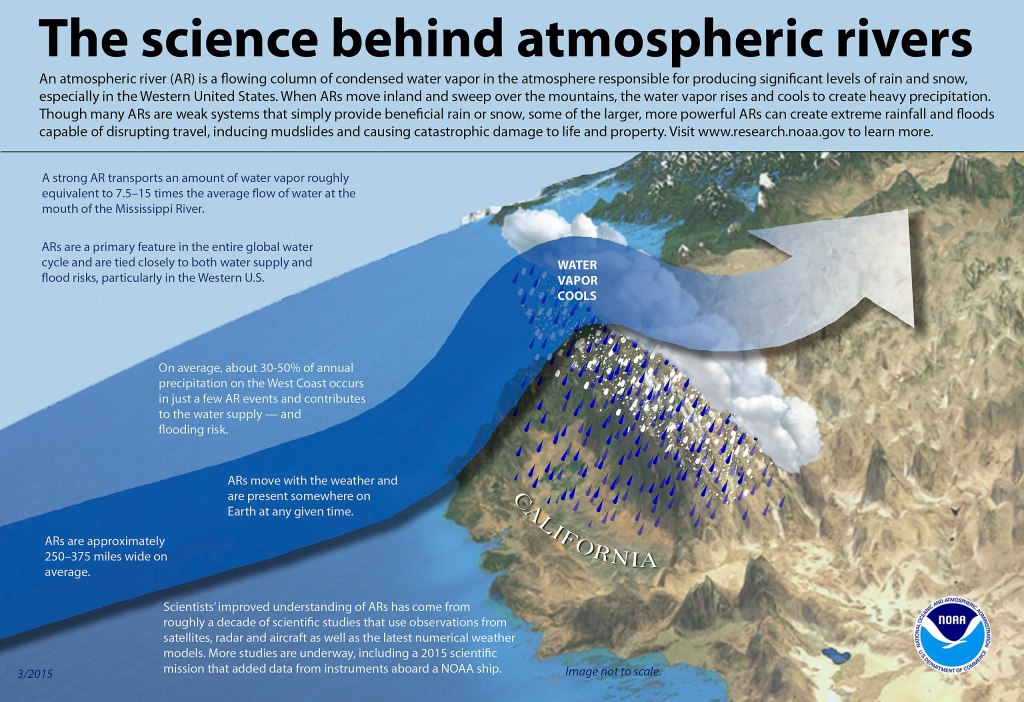
A graphic made by the National Weather Service that illustrates the science behind atmospheric rivers.
Atmospheric rivers begin forming above the oceans near the equator, where the sun’s energy is strongest. The intensity of the heat causes ocean water to evaporate and rise into the atmosphere, creating long, narrow bands of moisture or water vapor. These “rivers in the sky” don’t stay in one place the way rivers on land do; they’re constantly shifting and flowing around the globe and, generally speaking, they flow from the tropics near the equator toward the poles. At any time, about 90% of the water vapor moving from the warmest places on Earth toward the coldest places is concentrated into four or five of these atmospheric rivers around the globe. They are a vital feature of Earth’s hydrological cycle, often delivering needed moisture and replenishing snowpacks in areas affected by seasonal droughts.
Global climate change is making many types of extreme weather stronger, and atmospheric rivers are part of that trend. As the oceans get warmer, more water evaporates into the air, which means atmospheric rivers can carry even more moisture than they used to. Scientists found that in the future, the atmospheric rivers that crash into the Pacific Northwest might cause bigger floods. These strong storms could also push the ocean higher onto the shore for several days, perhaps as much as three times higher than what we see with today’s storms.
Here in the Pacific Northwest, you may hear the terms Chinook Winds or Pineapple Express to describe a specific atmospheric river that starts near Hawaii, where warm tropical ocean air gathers lots of moisture. (Note that the winds that people call Chinook Winds east of the Rockies are a different phenomenon.) The winds then pull this ‘sky river’ toward the West Coast, often bringing the Pacific Northwest days of heavy rain, strong winds, and warmer winter temperatures that can melt mountain snow and increase the risk of flooding.
Activity:
Since you can’t see an atmospheric river directly, you can observe signs of it:
- Check the sky: After a weather forecast says an atmospheric river is coming, go outside. Notice if the clouds are thick, gray, and moving quickly. Write down or draw what you see.
- Measure the rain: Place a cup or jar outside (add a ruler or mark lines with tape). After the storm, measure how much rain collected. Compare it over a few days.
- Look for patterns: Notice streams, puddles, or soil. How does the rain change your neighborhood? Do some areas collect more water than others? Why do you think that is?
Extensions:
1. Make a Rain Cloud in a Jar
STEM Concepts: condensation, precipitation, density
Materials: clear jar, water, shaving cream, food coloring
How it works:
Fill the jar with warm water, add a “cloud” of shaving cream on top, and drip colored water onto the cloud. When it becomes too heavy, the color “rains” down.
This activity models the basic processes that form rain in Earth’s atmosphere. In the real water cycle, warm air rises and cools, causing water vapor to condense around tiny particles to form clouds. These cloud droplets are suspended in the air because they are very small and relatively light. As more moisture accumulates, the droplets combine, grow larger, and eventually become too heavy to remain aloft. Gravity then pulls them downward as precipitation like rain, snow, or other forms depending on temperature.
In the jar model, the warm water represents the lower atmosphere, and the shaving cream stands in for a cloud layer. The food coloring mixed with water behaves like condensed moisture. As the colored water collects in the shaving-cream “cloud,” it mimics the increasing density and weight of real cloud droplets. When the cloud can no longer hold additional moisture, the color breaks through and falls into the jar. Just like rain falls when cloud droplets become heavy enough to overcome the upward forces that once kept them suspended.
Adapted from https://beyondtheplayroom.com/rain-cloud-science-experiment/
2. Visualize Evaporation with Salt!
STEM Concepts: evaporation
Materials: Salt, Water, Bowl, Food coloring
How it works:
Pour water into your bowl and add a few drops of food coloring to it, stir it around. Add your salt to the water. The more salt you add, the more dramatic the effect. Set aside for a few days and watch to see what happens!
When water evaporates, it becomes water vapor which is an invisible gas. So, for kids, it can appear as though the water simply vanishes. This simple investigation lets you observe evaporation directly by watching the liquid phase gradually disappear while the dissolved salt remains behind. The rate of evaporation changes depending on environmental conditions: a shallow volume of water evaporates more quickly, while a deeper bowl with more water (and the same amount of salt) will take longer to dry.
Experiment with variables to see how they influence evaporation. Fill two bowls with different ratios of salt to water and compare how long each takes to dry. Place one bowl in full sun and another in shade to observe the effect of temperature and solar exposure. Try freezing a saltwater solution – what happens when the icy mixture is placed back into the sun? How long does it take for the ice to melt and then fully evaporate?
This small-scale salt-and-water investigation offers countless opportunities to observe the water cycle in action and to notice how changes in heat, light, surface area, and volume affect the pace of evaporation.
Adapted from https://www.greenkidcrafts.com/water-cycle-salt-experiment/

Leave a comment